• Skip to primary navigation
  • Skip to main content
  • Skip to primary sidebar

Answer Your Tech

Wordpress How-to Guides

  • Writing
  • Settings
  • Jetpack
  • Navigation
  • Hosting
  • Getting Started
  • Themes
You are here: Home / Navigation / How to Create an AMP Menu in Wordpress

How to Create an AMP Menu in WordPress

December 9, 2016 By Matthew Burleigh

How to Create an AMP Menu in WordPress

Accelerated Mobile Pages (AMP) are super-fast versions of your Web pages that Google can show to visitors in lieu of your normal mobile site. AMP can make your site much faster for mobile users and, in conjunction with a cloud hosting company like Cloudways, can ensure that anyone visiting your site will have a fast, smooth experience. But AMP setup does not happen automatically, and requires a bit of configuration through the admin section of your WordPress site.

The steps below are going to show you how to create a menu that will be accessible through a Navigate link at the top of your site, then opens as a pop-out from the right side of the screen.

example wordpress amp menu

The configuration that we will be working on combines skills from two of our previous articles:

  • How to Create a Menu in WordPress
  • How to Add AMP to Your WordPress Site

You will need to already have the AMP setup in place following the steps in that guide. Once you have enabled AMP on your site using the two AMP plugins that we recommend in that article, then you can continue below to create a new menu, then set that as the AMP menu for your site.

Creating a New Menu in WordPress and Setting it as the AMP Menu

Step 1: Open the admin section of your WordPress site.

Step 2: Hover over Appearance in the left menu, then click the Menus option.

appearance, then menus

Step 3: Click the create a new menu link.

create a new menu

Step 4: Type a name for your AMP menu into the Menu Name field, then click the Create Menu button.

give the menu a name, then click create menu

Step 5: Use the Pages, Posts, Custom Links, Categories, etc. options to add the desired links to the menu, then click the Save Menu button.

save the new menu after adding links to it

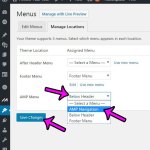
Step 6: Click the Manage Locations tab at the top of the window.

click the manage locations tab

Step 7: Click the drop-down menu to the right of AMP menu, select the menu that you just created, then click the Save Changes button.

how to create an amp menu in wordpress

Are you looking for an easy and inexpensive way to speed up your site? Learn how to configure Cloudflare and take advantage of the excellent speed and threat mitigation tools that their service provides.

Matthew Burleigh
Matthew Burleigh

Matt has been working with WordPress and creating content using this powerful content management system for years. While he has written about many other tech topics, WordPress is one of his favorites.

You can read his full bio here.

Join Our Free Newsletter

WordPress guides and deals

You may opt out at any time.
Read our Privacy Policy

Share this:

  • Click to share on Twitter (Opens in new window)
  • Click to share on Facebook (Opens in new window)
  • Click to share on Reddit (Opens in new window)
  • Click to share on LinkedIn (Opens in new window)
  • Click to share on Pinterest (Opens in new window)

Related

Primary Sidebar

Join Our Free Newsletter

WordPress guides and deals

You may opt out at any time.
Read our Privacy Policy

Recent Posts

  • How to Add a TXT DNS Record in Cloudflare
  • How to Enable or Disable User Registration in WordPress
  • How to Install and Configure the WP Rocket Plugin
  • How to Make WordPress Not Organize my Uploads into Month and Year-Based Folders
  • How to Turn on Cloudflare Hotlink Protection

Site Info

  • Domain Name - Hostgator
  • Hosting - Cloudways
  • Theme Framework - Genesis
  • Child Theme - Smart Passive Income Pro
  • Site Speed - WP Rocket

Archives

  • November 2022
  • October 2022
  • May 2022
  • July 2020
  • September 2019
  • July 2019
  • June 2019
  • May 2019
  • April 2019
  • March 2019
  • July 2018
  • December 2016
  • November 2016

Categories

  • Comments
  • Genesis
  • Getting Started
  • Hosting
  • Jetpack
  • Navigation
  • Plugins
  • Settings
  • Sidebar
  • Themes
  • Writing
  • Affiliate Disclosure
  • Privacy Policy
  • FAQ
  • About
  • Contact

Copyright © 2023 AnswerYourTech.com


Loading Comments...
 

You must be logged in to post a comment.