• Skip to primary navigation
  • Skip to main content
  • Skip to primary sidebar

Answer Your Tech

Wordpress How-to Guides

  • Writing
  • Settings
  • Jetpack
  • Navigation
  • Hosting
  • Getting Started
  • Themes
You are here: Home / Sidebar / How to Add Recent Posts to Your Sidebar in Wordpress

How to Add Recent Posts to Your Sidebar in WordPress

March 22, 2019 By Matthew Burleigh

How to Add Recent Posts to Your Sidebar in WordPress

When you create a new post on your WordPress site, you want to get as many people to read it as possible. This can be accomplished through various social media sharing options, but it can also be done by simply making links to the post more accessible across your site.

But manually adding these links can be a hassle, especially if you post a lot. Luckily there is a widget in WordPress that can automatically display your most recent posts in an area of your choosing.

How to Add the Recent Posts Widget in WordPress

The steps in this article were performed in the 5.1.1 version of WordPress. I am going to be adding the Recent Posts widget to the sidebar, but you can add it to any of the available widget areas for your theme.

Step 1: Sign into the admin section of your website at (yourdomain.com)/wp-admin.

Step 2: Hover over the Appearance tab at the left side of the window, then choose the Widgets option.

open the widgets menu

Step 3: Click on the Recent Posts widget at the center of the window (you might have to scroll down a bit), then drag it to the desired widget area at the right side of the window.

drag the recent posts option to the widget area

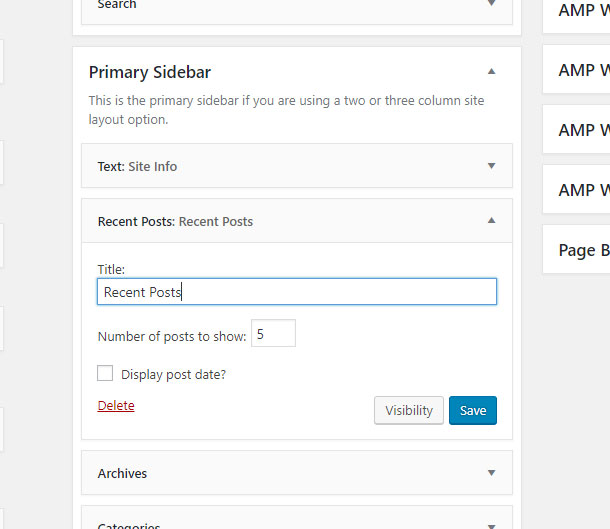
Step 4: Give the widget a title, if desired, choose the number of posts to show and whether to show the post date, then click the Save button.

how to add a recent posts widget to the sidebar in wordpress

You can then go to your homepage or whatever area the widget appears on and see how it looks.

Do you need to add something else to your sidebar, but can’t find a default widget that will do it? Find out how to add custom HTML to a widget so that you can create whatever you want.

Matthew Burleigh
Matthew Burleigh

Matt has been working with WordPress and creating content using this powerful content management system for years. While he has written about many other tech topics, WordPress is one of his favorites.

You can read his full bio here.

Join Our Free Newsletter

WordPress guides and deals

You may opt out at any time.
Read our Privacy Policy

Share this:

  • Click to share on Twitter (Opens in new window)
  • Click to share on Facebook (Opens in new window)
  • Click to share on Reddit (Opens in new window)
  • Click to share on LinkedIn (Opens in new window)
  • Click to share on Pinterest (Opens in new window)

Related

Primary Sidebar

Join Our Free Newsletter

WordPress guides and deals

You may opt out at any time.
Read our Privacy Policy

Recent Posts

  • How to Add a TXT DNS Record in Cloudflare
  • How to Enable or Disable User Registration in WordPress
  • How to Install and Configure the WP Rocket Plugin
  • How to Make WordPress Not Organize my Uploads into Month and Year-Based Folders
  • How to Turn on Cloudflare Hotlink Protection

Site Info

  • Domain Name - Hostgator
  • Hosting - Cloudways
  • Theme Framework - Genesis
  • Child Theme - Smart Passive Income Pro
  • Site Speed - WP Rocket

Archives

  • November 2022
  • October 2022
  • May 2022
  • July 2020
  • September 2019
  • July 2019
  • June 2019
  • May 2019
  • April 2019
  • March 2019
  • July 2018
  • December 2016
  • November 2016

Categories

  • Comments
  • Genesis
  • Getting Started
  • Hosting
  • Jetpack
  • Navigation
  • Plugins
  • Settings
  • Sidebar
  • Themes
  • Writing
  • Affiliate Disclosure
  • Privacy Policy
  • FAQ
  • About
  • Contact

Copyright © 2023 AnswerYourTech.com


Loading Comments...
 

You must be logged in to post a comment.