Navigation is a crucial part of a website, as it makes it possible for your readers to find the information they need. WordPress makes it easy for you to create a menu, and the theme that you are using for your site likely has a couple of default locations where a menu could go.
Our guide below will help you to create a new menu in WordPress, add some links to the menu, then set that menu to one of the locations on your site. The manner in which WordPress handles menus makes it very easy for you to return to this same location later if you want to change an existing menu link for something different.
Creating a Menu in WordPress 4.6.1
The steps below will show you how to create a new navigational menu for your WordPress site. After we have created the menu, we will add a couple of links to it. Once we have a menu with a couple of links, we will put it into one of the defined menu locations for our theme. The theme being used in this demonstration is the Smart Passive Income Pro Theme from Studiopress.
Step 1: Sign into the admin section of your WordPress site.
Step 2: Hover over Appearance in the left menu, then click the Menus option.

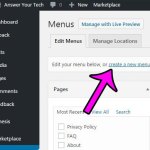
Step 3: Click the create a new menu link at the top of the window.

Step 4: Type a name for the menu into the Menu Name field, then click the blue Create Menu button.

Step 5: Select from the different default link options available at the left side of the menu (Pages, Posts, Custom Links, and Categories in the image below), check the box to the left of each item that you would like to add to your menu, then click the Add to Menu button.

Step 6: Drag an item in the menu to a different location (you can just click on one of the gray rectangles under Menu Structure and drag it to the desired spot in the menu order), then click the blue Save Menu button when you are done.

Step 7: Click the Manage Locations tab at the top of the window.

Step 8: Click the drop-down menu to the right of the theme location where you would like to put your new menu, choose the menu that you just created, then click the blue Save Changes button.

Is there information in your site’s sidebar that you don’t want there? Learn how to remove widgets from a sidebar in WordPress and take control over the information that you show to your visitors on the side of your site.
Matt has been working with WordPress and creating content using this powerful content management system for years. While he has written about many other tech topics, WordPress is one of his favorites.
You can read his full bio here.
You must be logged in to post a comment.